
This is our front hall closet; until recently, it was stuffed to the max with everything from winter coats and hats to my husband’s work books, to toddler toys, and more. This closet became a catch-all for everything we didn’t have a proper place for, and as this is the only closet that gets opened when we have company, it also became an embarrassing eyesore. This closet was long overdue for a makeover and some personality, both of which were accomplished in minimal time and with a minimal budget!
The first step to any organization/makeover project is to empty, sort, purge, and redefine the space! Even though this is technically our front hall closet, we don’t need it to function as a coat closet because we don’t use our front door for exit/entry into the house. Instead, this closet sits right off the playroom, so it’s an ideal place for additional toy storage as well as other random family things. With my closet’s purpose now determined, I was able to find new homes for everything that didn’t belong, purged items we no longer wanted/needed, and categorized what was left to be stored in the closet.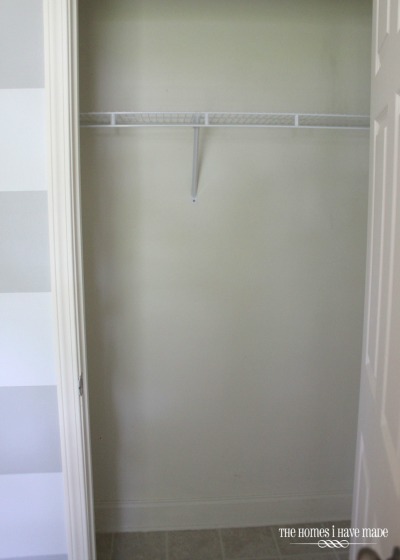 With my categories in mind, it was time to go shopping (both around the house and in stores) for some storage containers, shelves and fun details! I’m of the mind that if something is coordinated, well-styled and fun to look at, I’m more inclined to keep it clean and organized. Even though closets are behind closed doors, I always go the extra mile to make it fun and decorated. When picking out new items for this closet makeover, I kept in mind the décor of the adjoining spaces to this closet:
 Our main living spaces are full of preppy patterns, happy colors, and simple and streamlined organizational systems, so I looked for similarly-styled accessories! A quick trip through Marshalls and Lowe’s yielded everything I needed in a bright Kelly Green to coordinate with other spaces in our house!
 With about $100 in organizing supplies (including new totes and shelving) and an afternoon of quick DIY projects, we now have a bright, happy, and fully functional storage closet!
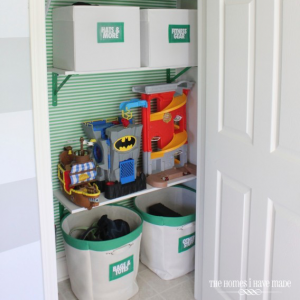
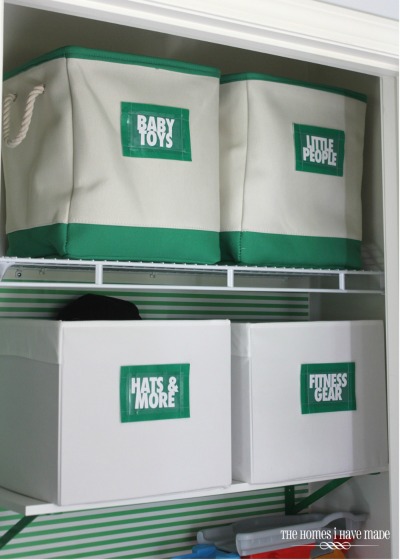
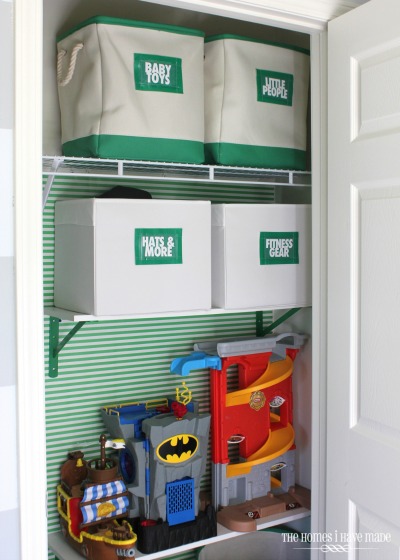
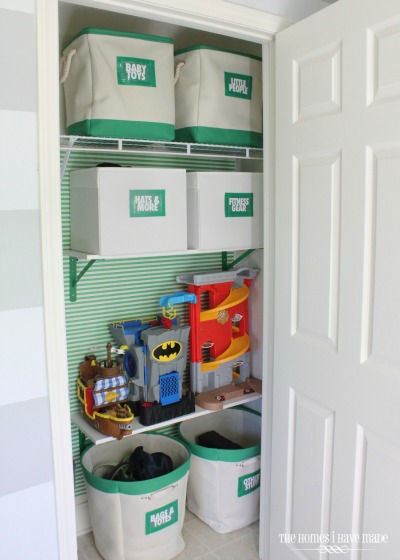
 Now storing everything from extra toys, fitness gear, bags, and winter gear in clearly labeled large bins, makes this closet easy to maintain. With the addition of some very simple DIY details, it’s also very easy on the eyes and oh-so-fun to open every day!

Let me show you what all I did to infuse some major style in this little closet!
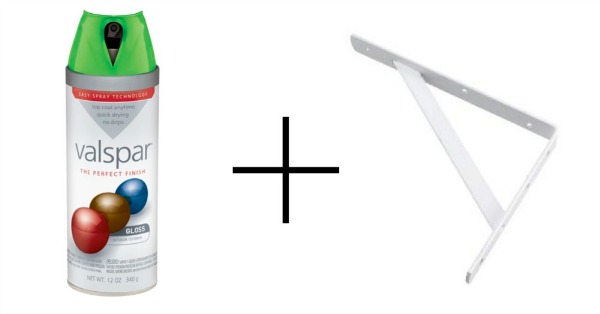
I started by using a roll of green and white striped wrapping paper along the back of the closet, held on with liberal amounts of double-stick tape. I’m a total sucker for a good stripe (they are EVERYWHERE in my house!), and this was an easy and cheap ($3!) way to give a huge style punch in the back of the closet. Keeping the scale of the stripes small set a playful tone without being too busy. If your apartment closet already has white metal shelves like ours does, it is really easy to unscrew the bracket, place the wrapping paper, and then rescrew the bracket back to the wall over the paper.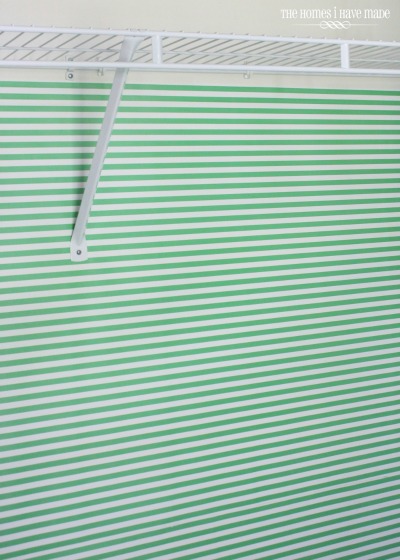 I knew that the one shelf along the top of the closet wasn’t giving us enough space for everything we needed to keep in this closet, so installing additional shelving was a top priority. These basic white shelves with wall brackets are easy to find and inexpensive, allowing you to get customized shelving for a fraction of the cost of built-in shelves. Plus, they are easy to take down and bring with you, making them ideal for renters! I can never resist adding a pop of color, so I spray painted the brackets, allowing them to fully dry before installing the shelves.
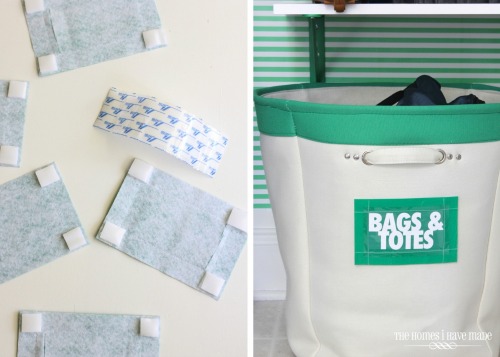
 Another idea that helps with organization and adds a fun pop of color is the addition of labels to any boxes, bins or totes you use. Not only do they help the entire family find what they are looking for, but they are a good opportunity to infuse more color and personality into a space. While my wall brackets were drying, I made these easy, quick, changeable, and removable labels for all of our totes!
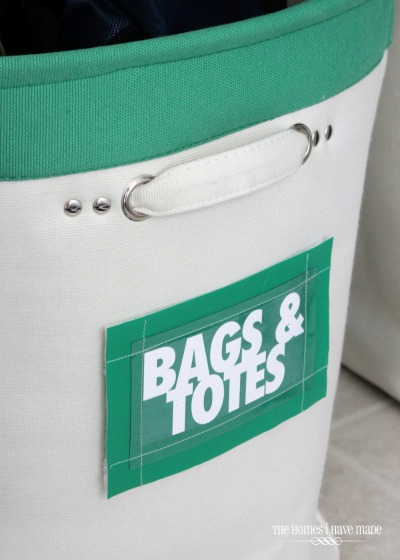 I started by cutting down some green marine vinyl (that I had in my stash, if you can believe it!) down to 4×6″ rectangles and some clear vinyl into 3×5″ rectangles. I sewed the clear vinyl to the marine vinyl in all four directions with contrasting white thread because I liked the detail of the stitching. Because marine vinyl doesn’t fray, I cut slits across the back of each label and slid in tags I designed and printed onto cardstock.
 I don’t like doing anything to nice totes that I can’t remove because I change my mind so frequently! As such, I wanted these labels to be 100% removable and not damage my totes in any way. Double-sided adhesive Velcro to the rescue! This stuff is so strong and sticks to anything. Four squares on the corners of my tags were the perfect solution for adhering my labels to my totes!
 This closet now holds exactly what we need it to in a fun and orderly way! The placement of the shelves all the way to the right allows for easy access of the totes while keeping the left side open for guests’ coats and our vacuum cleaner.
 If you’re keeping track, three small projects were all I did to give an otherwise un-assuming and boring closet some major style. Wrapping paper along the back, some colored shelving, and bright labels on coordinating totes give everything a connected and well-designed feel without being over done, complicated or expensive.
 Do you want a similar happy and preppy look in your closets? My recipe was pretty simple:

- Basic white shelving with separate metal brackets – found at any home improvement store in a variety of sizes and styles
- Labels/tags – DIY your own or use bright luggage tags to get a similar look!
- Canvas totes – great for storing anything from toys to clothes to sports equipment. Look for ones that are sturdy enough to stand on their own and have a bold graphic pattern!
- Canvas hampers – these larger stand-alone bins are great for larger sports equipment, cold weather gear, and large toys.
- Patterned wrapping paper – if you’re a renter, don’t bother with the hassle of wallpaper. Double stick tape works great, and wrapping paper rolls include just enough for small spaces!
- Spray paint – grab a can in a coordinating color of all your other accessories. Use it to paint brackets, baskets and other elements to tie them all together.
 Be sure to check out more storage and organization tips on the ForRent.com Apartment Living blog!
[cf]skyword_tracking_tag[/cf]
Be sure to check out more storage and organization tips on the ForRent.com Apartment Living blog!
[cf]skyword_tracking_tag[/cf]