This week we are celebrating the top five entries in our photo contest by sharing a post from their own blog sites. Today we have Shelley Smith talking about how she redid her pantry to make it into the Pretty Pantry that we all now know and love.
Pretty Pantry Organizing How-To’s with
The House of Smiths
Hello! My name is Shelley and I am the author of the blog, The House of Smiths.
Our blog is all about our family’s We’re so excited to be here, sharing a little bit of our kitchen pantry makeover process with all of you!

Case and Point: Our Pantry BEFORE

Our first step was to pull out EVERYTHING we had in our pantry.
I found these 3ft pieces of trim and thought they would be a subtle, great way to jazz up the shelf fronts a bit.

After about 3 coats of primer, we used some wood glue and adhered the trim on the fronts of all the shelves.
After the wood glue dried, I putty-ed up the cracks and painted all
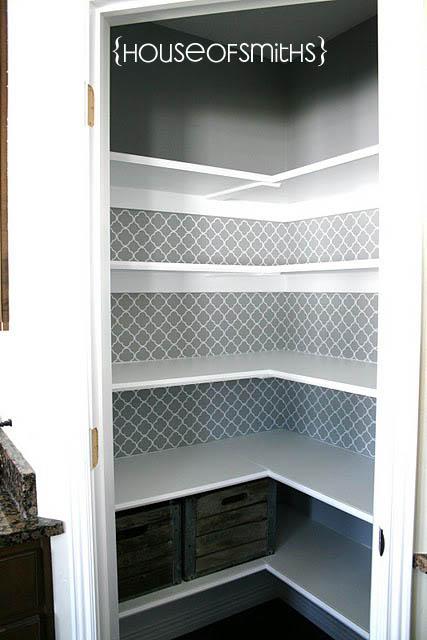
the shelves and molding semi-gloss white.
Next came the fun part! COLOR!
I picked out a gray I thought might work well in this small space.
Flagstone from Olympic.
Not too light, not too dark, and just enough warmth.
I got it home started painting the walls and fell in LOVE with this color! The gray popped perfectly against those white shelves!
After all of that painting we still wanted to have a fun element in the space, I decided to print out this fun, trendy quatrefoil design in vinyl, to back the walls with!
You can also use a small stencil if you’d like, to get the same effect!
So fun right!? I LOVE this pattern!
After that, we started loading everything back in, but now, in a very organized manner 🙂
Here are some great tips for getting YOUR pantry organized on a budget!
*Remove ALL food/electrical/bulky items that don’t get used or eaten on a weekly basis
All other products should be moved to another “food storage” location, if possible. This way, when you need to “restock” on pantry items that are low, you can easily refill them with your stored products and keep your “everyday” pantry clean and free of unnecessary clutter. If you don’t have ANY other space, utilize empty dead space on the floor with cute functional containers that you can easily pull out, that allow for extra storage.
* Place all items that you DO want or need to store and don’t use everyday… up high
*LABEL, LABEL, LABEL!!!
The more you label things, the better you’ll be at making sure your hard work doesn’t go to waste!
Containers or other storage items you’ve chosen to organize with will have a better chance at being refilled with the RIGHT products, things will stay more organized and you’ll find yourself “cleaning out the pantry” less and less.
*Categorize your Pantry
Baking Supplies, Snacks, Paper Goods, Canned Products… and so on.
It just makes sense… right? 🙂
This little crate was found at a thrift store for $0.50 cents.
I just added a vinyl label to the front.
I keep all the baking powders, vanilla and such in here.
Any SMALL products that tend to go scattered all over the pantry, in due time.
*Protect your Work!
I used these inexpensive furniture self stick pads to put on the bottom of all my “thrift store” organizational storage finds, that had rough bottoms or edges. I also lined all the pantry shelves with white contact paper to protect the paint for as long as I can. It might sound a little “fussy” to do all this for a pantry and more work and money, now… but it will keep you from having to take the time to retouch up paint in the future!
I HIGHLY recommend these two things.
Other food products that I use on a regular basis that can’t really go in containers are stored BEHIND the larger items.
Our family goes through a TON of cereal. And everyone likes different kinds.
So I didn’t want to waste my money on a bunch of different containers that I KNEW would always be half full and have tons of cereal dust crumbs in the bottom. But I ALSO knew that I HATED all the cereal boxes that would pile up in our pantry… making it look cluttered and smaller then the space already was!
So I used this wire crate, and ditched all the cereal boxes! Nothing fancy…But it works great!
*Keep Heavy, Less Used, Clutter Prone items down low.
Things like my large bottle of oil, vinegars, soy sauce, season salt… and such are stored low and hidden.
I don’t want to have to go to my “alternate storage place” to grab these items, but I don’t need to SEE them all the time either. So we found some vintage wood milk crates and used them for easy creative storage.
They just add a fun personalized element to the regular storage go-to containers for pantry’s.
In conclusion…
*Make YOUR pantry work for YOUR Family!
Everyone has different ways of accessing their food, and how they like to keep it stored.
But I promise that if you find functional, easy, clearly marked, (and beautiful doesn’t hurt either) storage solutions for your pantry… you will be LOVING life, so much more!
For more fresh, creative, budget friendly organizing and decorating tips, come visit us at thehouseofsmiths.com!


