Living in a small space isn’t always easy. In our 650 sq. ft. apartment I feel like I’m always bumping in to my husband, tripping over our cats, or maneuvering around a coffee table that’s just a little too big for the space. But that doesn’t mean we don’t love it! Having a small apartment has forced us to get creative with our space, and I love seeing just how much functionality I can squeeze out of every nook and cranny in this place!

I love DIY, gardening, crafting, and sewing, and there’s no way I would let our small space stop me from enjoying my passion! The apartment may have seemed too small initially, but I found that thinking outside the box and getting creative with the space made 650 sq. ft. exactly enough room to do the things we love!
The first thing I noticed about this apartment when we moved in three years ago was the lack of closet space. Growing up I had two huge closets in my bedroom, so I might be a little spoiled in that department. We have a normal sized linen closet just outside the bathroom, and a large-ish double door closet in the living room. But the bedroom is just one big room with four smooth walls; no closets whatsoever!
So the very first thing we did when we moved in was “build” a “closet” into the bedroom. It takes up a couple of feet of space and makes the bedroom feel a little bit smaller, but the added storage space is definitely worth it!
![Small Space Organization: Fit Your Life Into Your Space-Bedroom_Closet[1]](https://www.forrent.com/blog/wp-content/uploads//2014/02/Small_Space_Organization-Bedroom_Closet1.jpg)
We bought a long dowel, a wooden board, and a bunch of L brackets at Home Depot and got to work! We installed the brackets, being sure to hit the studs in the wall, attached the shelf and dowel to the brackets, and voila, instant closet! It’s not the prettiest solution, but it certainly does the trick. We can hang up our clothes and use the space underneath for shoes, and the shelf above the dowel is perfect for additional storage. The large blue buckets hold our winter clothes (or summer clothes during the winter), seasonal decorations, extra tablecloths and comforters, etc.
I even managed to create a place at the other end of the room for my craft supplies! I’m telling you, these free-standing wire shelving units are just the best; so versatile and functional! One shelf is in front of the window, but there is still plenty of light in the room. Plus, it’s either too hot or too cold in Chicago to open the windows about 90% of the year, so we decided it made better sense to prioritize storage space over window access.

As for the linen closet outside the bathroom, it was just a giant, empty closet when we moved in; no shelves or anything! So we went back to Home Depot and bought a few adjustable metal shelf racks, metal brackets, and some white shelves. When we got home, we cut the shelves to size and installed them in the closet to make our very own customized U-shaped storage solution!
![Small Space Organization: Fit Your Life Into Your Space-Linen_Closet[1]](https://www.forrent.com/blog/wp-content/uploads//2014/02/Small_Space_Organization-Linen_Closet1.jpg)
It still feels a little bit cluttered sometimes, but man can we put a TON of stuff in that closet now! I bought small plastic buckets to help organize our stuff; there’s one for first aid, one for hair care stuff, one for all of our allergy pills and headache meds, etc. And we purposely left the bottom half of the closet open so that we could stand brooms and vacuum cleaners down there without them being in the way of shelves. A small free-standing wire shelving unit holds all of our towels and sheets and things.
The closet in the living room was the biggest challenge. There was certainly a lot of space in the closet, but it’s mostly vertical space, and that’s always hard to use effectively unless everything you’re storing is in boxes that stack easily. But again, a few free-standing shelving units and some awesome Rubbermaid organizers from Home Depot saved the day!
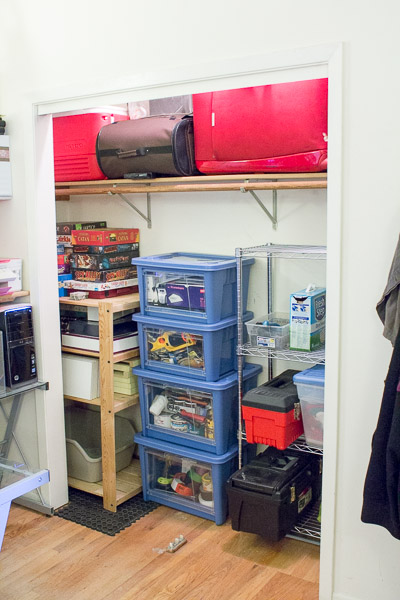
Since we have no garage and no basement, this closet is basically our “storage unit”. We have our suitcases, our Christmas decorations, sleeping bags, an air mattress, a wheeled cooler, and more up on the top shelf. And then down below in the more reachable areas are our board games, all of my power tools and toolboxes, our “office” supplies like printer paper and ink, all of my paint and painting tools, etc. Again, it’s a little hectic, but I had a ton of fun getting this closet organized, and I’m pretty sure there’s not a single inch of wasted space at this point!
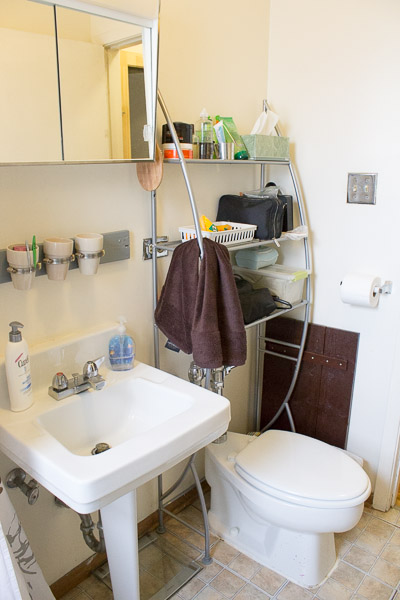
I added a small metal shelving unit over the toilet in the bathroom because, with a pedestal sink, there was no other bathroom storage, save for the ridiculously tiny mirrored medicine cabinet over the sink. I also made some wall-mounted storage out of three tiny flower pots, a board, and some pipe hose clamps. I hung that right above the sink and it’s PERFECT for holding q-tips, cotton balls, tweezers, etc. in easy reach. (
Our bathroom is so small I had to stand in the very back corner of the tub to get this shot! I need a wide angle lens… :-p)
Once the “storage” issues were handled and things were neatly put away, it was time to focus on the living areas of the apartment. Perfect, because I needed a “craft room”! It’s really important to me to have a dedicated space where I can be creative. I tried crafting on the dining room table and at my computer desk, but it was just too cluttered and busy. When I had to “borrow” space from other areas of the apartment, crafting became a chore instead of a fun, creative outlet. So I knew it was time to reorganize my priorities a bit and make myself a dedicated creative space.
We were already using all of our living spaces; there wasn’t any “extra” room to set aside for crafting. So we looked around to see what we weren’t using efficiently, and realized that the dine-in area of our kitchen was the perfect spot. We had a dining room table there, but didn’t use it much. I mentioned to my husband that I wanted a crafting space, and he was totally on board, so we got rid of the dining room table and I repurposed the area as a “craft room”! Now I have a creative space all to myself, and it’s great! I installed a huge desk that I made out of a door and some cubby shelves. The door gives me a large work surface, and the cubby shelf “legs” give me tons of added storage space for all of my supplies.

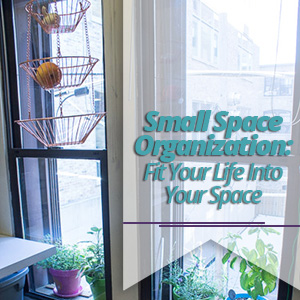
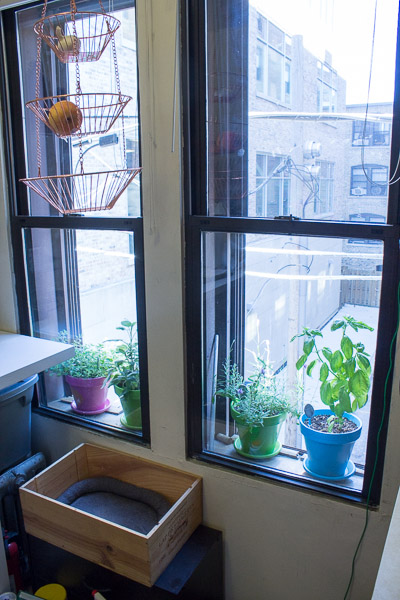
I even managed to find some space to garden in our apartment! We have ridiculously thick exterior walls in our brick apartment building, so we actually have two sets of window panes with about ten inches of “window sill” between them; I put six potted plants in our kitchen windows and now I can garden!
All in all I’m pretty thrilled with how much usable space I was able to eke out of this small apartment! Remember, just because you don’t have
a lot of space doesn’t mean you don’t have
enough space. You can always make room for the things you love by utilizing your space more efficiently or finding creative, unconventional uses for your space!
What’s the most creative organizing you’ve done in your home?
![Jessi_at_Practically_Functional[3]](https://www.forrent.com/blog/wp-content/uploads//2014/02/Jessi_at_Practically_Functional3.png)
 I love DIY, gardening, crafting, and sewing, and there’s no way I would let our small space stop me from enjoying my passion! The apartment may have seemed too small initially, but I found that thinking outside the box and getting creative with the space made 650 sq. ft. exactly enough room to do the things we love!
The first thing I noticed about this apartment when we moved in three years ago was the lack of closet space. Growing up I had two huge closets in my bedroom, so I might be a little spoiled in that department. We have a normal sized linen closet just outside the bathroom, and a large-ish double door closet in the living room. But the bedroom is just one big room with four smooth walls; no closets whatsoever!
So the very first thing we did when we moved in was “build” a “closet” into the bedroom. It takes up a couple of feet of space and makes the bedroom feel a little bit smaller, but the added storage space is definitely worth it!
![Small Space Organization: Fit Your Life Into Your Space-Bedroom_Closet[1]](https://www.forrent.com/blog/wp-content/uploads//2014/02/Small_Space_Organization-Bedroom_Closet1.jpg) We bought a long dowel, a wooden board, and a bunch of L brackets at Home Depot and got to work! We installed the brackets, being sure to hit the studs in the wall, attached the shelf and dowel to the brackets, and voila, instant closet! It’s not the prettiest solution, but it certainly does the trick. We can hang up our clothes and use the space underneath for shoes, and the shelf above the dowel is perfect for additional storage. The large blue buckets hold our winter clothes (or summer clothes during the winter), seasonal decorations, extra tablecloths and comforters, etc.
I even managed to create a place at the other end of the room for my craft supplies! I’m telling you, these free-standing wire shelving units are just the best; so versatile and functional! One shelf is in front of the window, but there is still plenty of light in the room. Plus, it’s either too hot or too cold in Chicago to open the windows about 90% of the year, so we decided it made better sense to prioritize storage space over window access.
We bought a long dowel, a wooden board, and a bunch of L brackets at Home Depot and got to work! We installed the brackets, being sure to hit the studs in the wall, attached the shelf and dowel to the brackets, and voila, instant closet! It’s not the prettiest solution, but it certainly does the trick. We can hang up our clothes and use the space underneath for shoes, and the shelf above the dowel is perfect for additional storage. The large blue buckets hold our winter clothes (or summer clothes during the winter), seasonal decorations, extra tablecloths and comforters, etc.
I even managed to create a place at the other end of the room for my craft supplies! I’m telling you, these free-standing wire shelving units are just the best; so versatile and functional! One shelf is in front of the window, but there is still plenty of light in the room. Plus, it’s either too hot or too cold in Chicago to open the windows about 90% of the year, so we decided it made better sense to prioritize storage space over window access.
 As for the linen closet outside the bathroom, it was just a giant, empty closet when we moved in; no shelves or anything! So we went back to Home Depot and bought a few adjustable metal shelf racks, metal brackets, and some white shelves. When we got home, we cut the shelves to size and installed them in the closet to make our very own customized U-shaped storage solution!
![Small Space Organization: Fit Your Life Into Your Space-Linen_Closet[1]](https://www.forrent.com/blog/wp-content/uploads//2014/02/Small_Space_Organization-Linen_Closet1.jpg) It still feels a little bit cluttered sometimes, but man can we put a TON of stuff in that closet now! I bought small plastic buckets to help organize our stuff; there’s one for first aid, one for hair care stuff, one for all of our allergy pills and headache meds, etc. And we purposely left the bottom half of the closet open so that we could stand brooms and vacuum cleaners down there without them being in the way of shelves. A small free-standing wire shelving unit holds all of our towels and sheets and things.
The closet in the living room was the biggest challenge. There was certainly a lot of space in the closet, but it’s mostly vertical space, and that’s always hard to use effectively unless everything you’re storing is in boxes that stack easily. But again, a few free-standing shelving units and some awesome Rubbermaid organizers from Home Depot saved the day!
It still feels a little bit cluttered sometimes, but man can we put a TON of stuff in that closet now! I bought small plastic buckets to help organize our stuff; there’s one for first aid, one for hair care stuff, one for all of our allergy pills and headache meds, etc. And we purposely left the bottom half of the closet open so that we could stand brooms and vacuum cleaners down there without them being in the way of shelves. A small free-standing wire shelving unit holds all of our towels and sheets and things.
The closet in the living room was the biggest challenge. There was certainly a lot of space in the closet, but it’s mostly vertical space, and that’s always hard to use effectively unless everything you’re storing is in boxes that stack easily. But again, a few free-standing shelving units and some awesome Rubbermaid organizers from Home Depot saved the day!
 Since we have no garage and no basement, this closet is basically our “storage unit”. We have our suitcases, our Christmas decorations, sleeping bags, an air mattress, a wheeled cooler, and more up on the top shelf. And then down below in the more reachable areas are our board games, all of my power tools and toolboxes, our “office” supplies like printer paper and ink, all of my paint and painting tools, etc. Again, it’s a little hectic, but I had a ton of fun getting this closet organized, and I’m pretty sure there’s not a single inch of wasted space at this point!
I added a small metal shelving unit over the toilet in the bathroom because, with a pedestal sink, there was no other bathroom storage, save for the ridiculously tiny mirrored medicine cabinet over the sink. I also made some wall-mounted storage out of three tiny flower pots, a board, and some pipe hose clamps. I hung that right above the sink and it’s PERFECT for holding q-tips, cotton balls, tweezers, etc. in easy reach. (Our bathroom is so small I had to stand in the very back corner of the tub to get this shot! I need a wide angle lens… :-p)
 Once the “storage” issues were handled and things were neatly put away, it was time to focus on the living areas of the apartment. Perfect, because I needed a “craft room”! It’s really important to me to have a dedicated space where I can be creative. I tried crafting on the dining room table and at my computer desk, but it was just too cluttered and busy. When I had to “borrow” space from other areas of the apartment, crafting became a chore instead of a fun, creative outlet. So I knew it was time to reorganize my priorities a bit and make myself a dedicated creative space.
We were already using all of our living spaces; there wasn’t any “extra” room to set aside for crafting. So we looked around to see what we weren’t using efficiently, and realized that the dine-in area of our kitchen was the perfect spot. We had a dining room table there, but didn’t use it much. I mentioned to my husband that I wanted a crafting space, and he was totally on board, so we got rid of the dining room table and I repurposed the area as a “craft room”! Now I have a creative space all to myself, and it’s great! I installed a huge desk that I made out of a door and some cubby shelves. The door gives me a large work surface, and the cubby shelf “legs” give me tons of added storage space for all of my supplies.
 I even managed to find some space to garden in our apartment! We have ridiculously thick exterior walls in our brick apartment building, so we actually have two sets of window panes with about ten inches of “window sill” between them; I put six potted plants in our kitchen windows and now I can garden!
 All in all I’m pretty thrilled with how much usable space I was able to eke out of this small apartment! Remember, just because you don’t have a lot of space doesn’t mean you don’t have enough space. You can always make room for the things you love by utilizing your space more efficiently or finding creative, unconventional uses for your space!
What’s the most creative organizing you’ve done in your home?
![Jessi_at_Practically_Functional[3]](https://www.forrent.com/blog/wp-content/uploads//2014/02/Jessi_at_Practically_Functional3.png)
