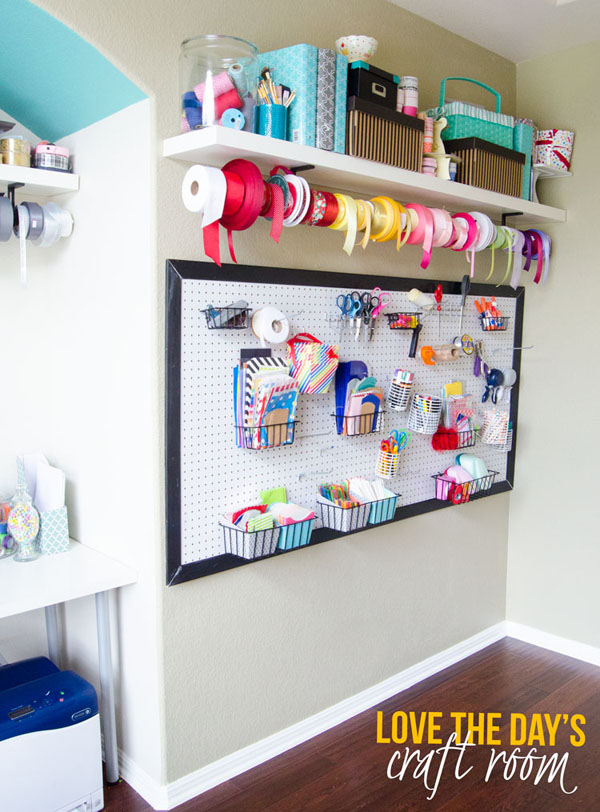
Are you a crafter? A Martha Stewart without the title or empire? If you are, you probably have accumulated massive amounts of crafting supplies like ribbon, punches, paper, washi tape and twine. And if you’re like me, without a home for all these fun tools, things can get a little messy. For years my craft nook (I wish I could say it was a room) looked like Michaels had exploded in the corner. I had piles of supplies all over the place, and because I could never find a particular supply when I needed it, I would just go buy more supplies! It was a very dangerous cycle, as I amassed a large quantity of craft goodness in a very short amount of time. I finally took a good, honest look at my craft explosion and decided I needed to get organized. I only had a small space to work with, but it turns out you only need a wall to organize all your crafting treasures. Here is what I did:

Pegboard
First things first; I knew I needed a system to hang or organize all my supplies where I could see them. If my supplies were tucked away in drawers, I would never use them and just go to the craft store (because any excuse is good enough, right?) and buy new goodies. So I decided to hang a pegboard. I went to Home Depot, purchased a large, pre-painted board (white) and brought it home. To hide its rough edges, I painted nailed trim around the board. Once the board was hung, I searched around for baskets, hooks and bins to hang from the board. I found a good selection at Michaels, Home Depot and IKEA. I am obsessed with how the pegboard turned out and love having all my supplies and tools right at my fingertips.

Shelves
After my board was hung, I realized I still had supplies that needed a home. They were tricky things to hang on a pegboard, like cupcake wrappers, work binders, cake stands and boxes filled with work documents. I decided I needed some shelving. I went back to IKEA, picked out a white shelving unit and went to work assembling it. The shelf is super sturdy and works great for those items I don’t need every day. And the shelf was imperative in helping me organize my most treasured craft tool: my ribbon.

Curtain Rod
I’m not going to lie; ribbon organization is my favorite aspect of the new craft wall, and I’m super proud of it! My husband, alarmed by the ridiculous number of ribbon spools I had accumulated, wanted to get it off the floor and hung somehow. We decided to install a curtain rod (purchased at IKEA) on the shelving unit described above. We reinforced the rod along the shelf and created the perfect home for all my ribbon. The rod is heavy enough to hold all that ribbon and more!

The whole craft wall took less than two weekends to assemble, and I was up and organized in no time.
3 Incredibly Clever Ways to Organize a Craft Room
Apartment Living

Recommended Articles
Apartment Living
5 Min. Read
How to Search for Properties on ForRent.com
Searching for the perfect apartment or rental home? Well, you’ve come to the right place! Here at ForRent.com, we have an extensive selection of online listings just waiting to be explored. Whether you want…
Apartment Living
8 Min. Read
Apartment Safety 101
One of the biggest draws to apartment living is safety. Most apartment buildings have helpful security features like gated entrances, surveillance cameras, and on-site management. However, that doesn’t mean tenants shouldn’t take their own…
Apartment Living
7 Min. Read
How to Create a Beautiful Patio or Balcony Space
Renting an apartment often means letting go of the luxury of a big, private yard. However, just because you’re in an apartment doesn’t mean you can’t have your own outdoor space. Many modern condos…
Apartment Living
7 Min. Read
The Pros and Cons of Renting a House
There are many reasons why you might choose to rent a house. Whether you want more yard space for your pet, privacy from neighbors, or the simple luxury of getting packages delivered to your…
