Unless you build your own home, chances are pretty good that the storage space in your current living arrangement doesn’t exactly fit your specific needs.
And when it comes down to clothing storage, it seems everyone is looking for and needing more than what they have.
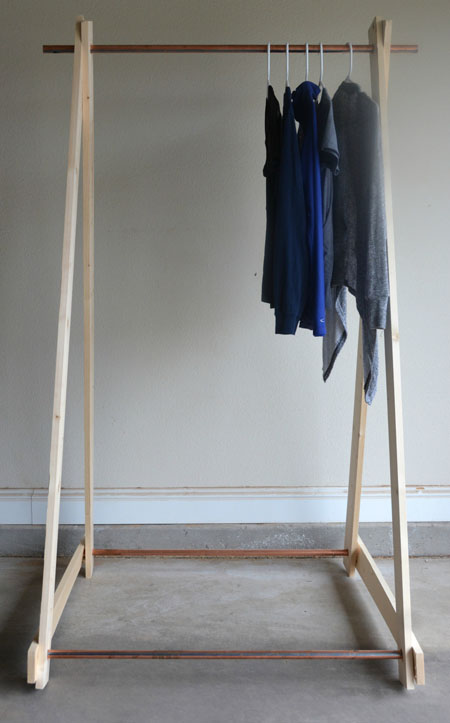
You can always buy more and more storage boxes, but you can’t always see what is in them, much less waste your time pulling them out all the time. Plus, buying more furniture costs more money and takes up more space than what we have. An easy solution is to build a small clothing rod to fit in the corner of a room. Fill it with your work clothes or your go-to items that are in constant rotation, and it will become a life saver. It doesn’t hurt that it’s pretty eye-catching!
Materials:
(This was built according to the dimensions I needed for my space.)
- 5 pieces of lumber, measuring 6’ in length (1″x3″x6′); cut the last piece in half
- 3/4″ copper rod, measuring 10’ in length (it’s cheaper to buy one long rod instead of individual pieces)
- E6000 adhesive
- Staple gun or hammer and small nails
Gather all of your lumber and copper rod at your home improvement store. Most stores will cut all the lumber and copper rod down to size.
My local store will even drill holes if needed.
I had them make the holes 1″ to accommodate the 3/4″ copper pipe, making sure to double the holes on the last piece that was cut in half.
I also had them cut the copper pipe into thirds.
After all pieces have been cut to size and holes have been drilled, lay out two large pieces and one small one.
Align holes and form a triangle.
Staple or nail it into place, making sure the holes stay aligned.
After you have made two sets of triangle end pieces, set each side upright, making sure you have support on each side.
Run the copper rods in through each set of holes.
After the rods are set in place, apply the E6000 between the rod and wood, making sure it has proper support and is stable. I would highly recommend assembling and applying the E6000 close to the spot you are going to want it placed.
Let it set and dry according to the time prescribed on the tube of E6000.
After the glue has dried, move if needed.
Gather your clothes and place them on the rod.


