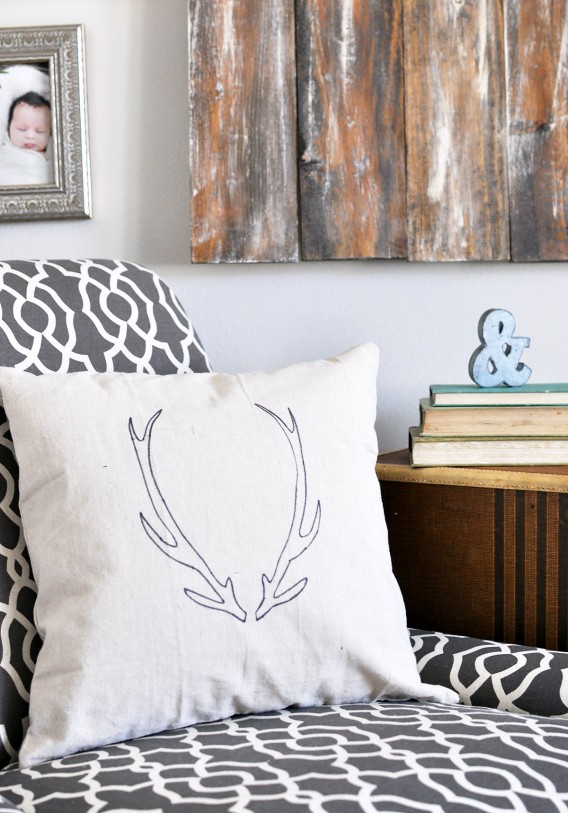
Antlers are all the rage these days! There are antlers on walls, antlers on pillows and antler printables. Let’s face it, antlers kinda rock! Now, I have to be honest: I’m not a big fan of REAL deer heads — those creep me out a tiny bit (no offense) because it feels a little like they are staring at me. But I do love faux antlers! So today I’m going to show you how to make your very own antler pillow without spending a ton of money!
You don’t need any fancy tools for this tutorial. Actually, you’ll probably find that you have most everything on hand already! Here is what you will need:
Supplies:
- 1 plain pillow cover (The one I used can be found here — don’t forget your 40% off coupon)
- Sharpie
- Ability to print on cardstock
- 2 sheets of cardstock
- X-ACTO knife
- Cutting mat or cardboard
- Tape
- Pillow insert or old pillow to put in cover
How to Make a DIY Antler Pillow:
The first thing you need to do is find the type of antlers you want to use. I just searched Pinterest for free antler images. (Make sure you are able to download one without copyright issues.) Once you find the one you want, open it up in a photo editing program and make sure it is sized to fill up your 8.5” x 11” cardstock, then print it off. Once it’s printed, I just used an X-ACTO knife to cut it out. If you don’t have a cutting mat, you can use a few layers of cardboard to cut on, but a cutting mat is ideal.

Now let’s take your pillow cover out of the packaging. If it is extremely wrinkled for any reason, you might want to iron it first. Once it’s all ironed out, you will need to put a piece of cardstock inside the pillow cover under where your stencil will go. This will keep any Sharpie marks from bleeding onto the other side of your pillow cover. Then center up your stencil on the pillow and tape it in place. I used painter’s tape.

Once everything is taped down, you just need to draw an outline around the edges of your stencil. Super easy! I decided not to fill in my antlers and just leave them as the outline; if you prefer, though, you can use your Sharpie to color it in. Again, make sure you have your cardstock underneath the first layer of fabric to avoid anything bleeding through!

I decided to wash my pillow cover after I drew the antlers on. I did this same process with some tea towels, and it gives them a nice slightly-faded look! Just make sure you follow the washing instructions for your pillow cover! I’d let the Sharpie sit on the fabric for 24 hours before washing just to make sure it’s fully dried.
Now you can sit back and enjoy your pillow — and the fact that you just saved a ton of money!

To go with your new pillow, here is a great idea for some inexpensive artwork you can check out! Leave a comment below and tell us some of your favorite things to decorate with!